Testing is supposed to be a tool for us developers to help us write code that is easier to maintain, read and extend. I honestly believe you do this for yourself first and your team, stakeholders, product owners etc. second. It trains you to write code in a way that makes your daily work easier for you.
In this article I want to introduce a practical approach of Test Driven Development. It might be easier to pick up for those developers who are used to writing code first.
We will be using JUnit and Java for this example, but the method is suited for all languages and technologies.
What is Test Driven Development?
Test Driven Development, TDD for short, is not simply a technique but also a mindset. By using TDD, developers are forced to think in small, well-defined, modular classes, rather than resorting to monolithic program structures.
If we strictly apply TDD principles, the test is written before the implementation; similarly to how rough software requirements exist before any implementation was even made. In order to write a e.g. unit test before implementing a specific class, we need to consider its use case, its functional scope, implementation details, inner structure and the API that is exposed and available for other developers. That can be a lot to take in all at once, so in practice it’s better to start small and then keep building as we go.
To string a rough vision or set of requirements together to transform that into a functionality, workflow and concrete implementation is in my opinion a form of high art that seems impossibly difficult to master, but it is possible with the right set of tools.
Note a requirements analysis like this is where a great intersections exist between hands-on code implementation and software architecture of larger systems.
Introduction to Test Driven Development
Getting down the Requirements
Before you implement a class by employing TDD as technique, you need to figure out requirements in a way they can be used for an implementation. For a larger chunk of functionality, there is a lot of work to be done beforehand, for example:
- Create a written list of functionality or behavior you want to implement
- Identify roles and responsibilities within this functionality
- Cut these roles and responsibilities into the smallest logical chunks possible
- Identify behaviors you wish to implement
- Group behaviors into chunks that logically belong together; these are your classes that you will implement
A couple of things you can do to identify behaviors is briefly outlined in another article I wrote (more articles might follow).
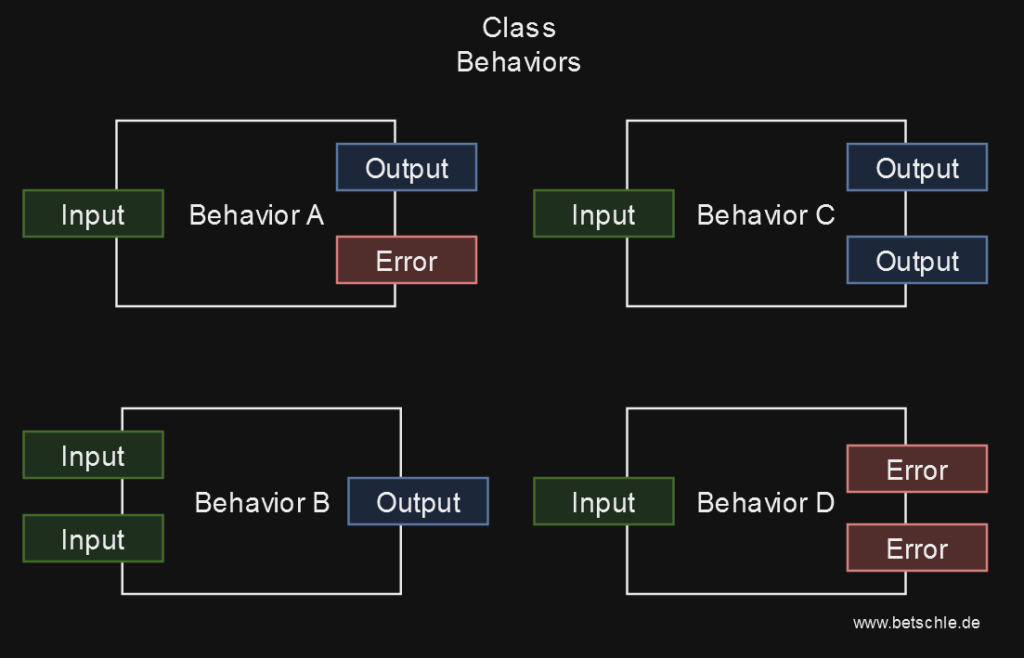
Think of each class as a graph with multiple behavior nodes, that possess input, output and exception/error pins, which all have to be defined. Each of these pins should represent a behavior, e.g. via edge case or a range of valid or invalid inputs. For each of these pins automated unit tests can be written.

Visually, the behavior of an entire class can be defined as follows:

Mind you these diagrams do not adhere to any standards (e.g. UML), they should only illustrate patterns and help with general understanding.
What we do need to know to write an automated unit test using TDD principles for a single class is:
- the scope of the class
- the functionality (ergo, methods) of the class
- potential errors thrown, per method
- all possible outputs, per method
By defining the requirements in this way, we are creating some sort of intermediate layer between requirements and concrete implementation which can be used as basis for an automated test.
This process has distant resemblance to Behavior Driven Development, but for this article I will not dig deeper into that.
Writing your first Test
During your developer career, you (hopefully) wrote a lot of code and you may toy around and try out things in a sandbox project. In Java, you typically create a class, write some static methods and start toying around in a public static void main( String[] args).
But: when you notice you’re typing up a main method like this, e.g. to see what you’re doing is right or not, you’re already halfway there on your journey towards TDD. Then you might as well start writing an automated test to help yourself out. In terms of typing effort, there isn’t too much of a difference.
Any class in any object-oriented language has an initial state and may show different behaviors as it is being used inside an application. Therefore, one of the simplest unit tests you can write is “create an instance of this object and ensure its internal parameters are initialized properly”.
A test like this can make a lot of sense for certain use cases, e.g. an asynchronous min or max search.
Testing Behaviors
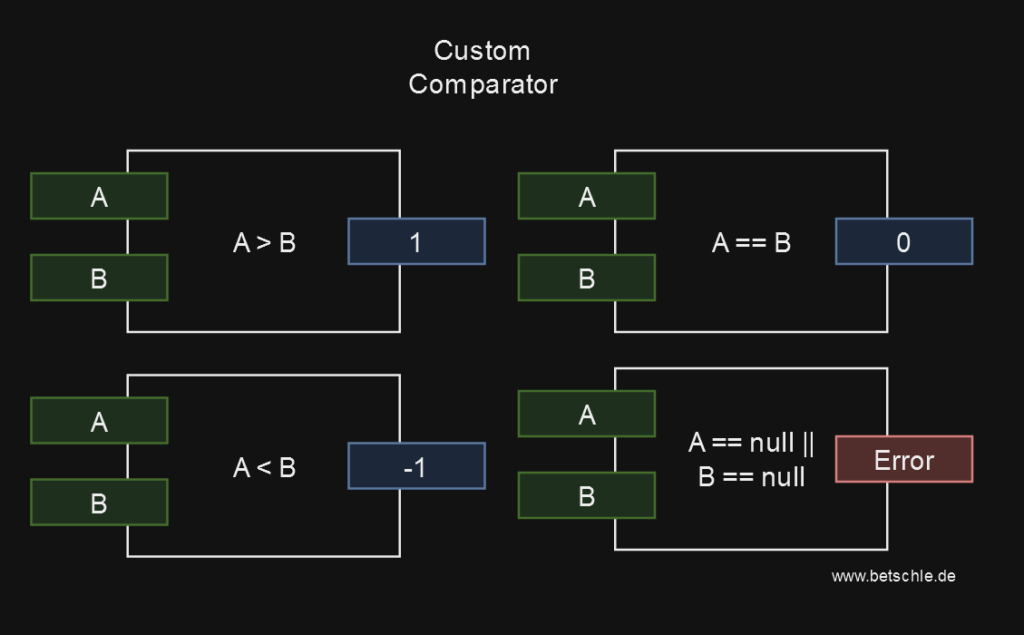
To connect to my previous diagrams, I’ve created this diagram as concrete example, illustrating how the Comparator.compare() method works in Java, cut into each possible output.

We have two inputs, A and B, and assume they are both numbers (e.g. a custom number implementation). If A is larger than B, we expect a 1, if it is smaller, we expect a -1 and a 0 if they are equal, as per Java specification for the compare() method.
For context, as to why would you do this: Implementing a class inheriting this interface allows comparison of number (or also object) instances, such that e.g. they can be sorted in a custom way using the Collections.sort() or stream.sort() methods. For example, this interface allows you to sort instances of a People class according to their age.
If edge cases and possible outcomes are defined like this, using TDD becomes ridiculously easy. With this amount of clarity and small scope we can deduce a method signature and with that, start writing tests before the implementation even exists. The signature of the method specified is int compare(Integer A, Integer B).
Now a possible test with Java and JUnit can look like this:
@Test
public void IsALargerThanB() {
   CustomComparator comparator = new CustomComparator();
   Assertions.assertTrue( comparator.compare(100, 10) == 1);
}
If we haven’t actually implemented logic yet, this test will fail and be red, until we implement the logic which will make that test pass, that means turn green. The implementation logic is pretty straightforward, assuming what we are comparing are integers (just note we are reinventing the wheel here as Integer.compare() exists, but it suffices for illustrative purposes):
public class CustomComparator implements Comparator<Integer> {

  @Override
  public int compare(Integer A, Integer B) {
    if( A == null) throw new NullPointerException("A cant be null");
    if( B == null) throw new NullPointerException("B cant be null");
    if( A > B ) return 1;
  }

}
Our IsALargerThanB() test is now turning green, but our implementation is still incomplete. In the next steps we’d implement the rest of the edge cases, by simply adding to the compare() method. I recommend to do so incrementally: per method or behavior, implement the test first, then proceed with the actual implementation, until all tests turn green. You should avoid creating a fully fleshed out test first, and then adding a full implementation (I do not think that’s the point of TDD).
The second iteration of our compare() method together with its tests looks like this:
@Test
public void IsASmallerThanB() {
    CustomComparator comparator = new CustomComparator();
    Assertions.assertTrue( comparator.compare(0, 30) == -1);
}

@Test
public void IsAEqualsB() {
    CustomComparator comparator = new CustomComparator();
    Assertions.assertTrue( comparator.compare(20, 20) == 0);
}

@Override
public int compare(Integer A, Integer B) {
     if( A == null) throw new NullPointerException("A cant be null");
     if( B == null) throw new NullPointerException("B cant be null");
     if( A > B ) return 1;
     if( A < B ) return -1;
     return 0;
   }
This is pretty much the entire implementation of this method, maybe inelegant for the sake of simplicity and illustrative purposes. But we do not have full test coverage yet. To get a better coverage, we need to design a test that checks on the edge cases. In this case it’s relatively easy: we feed our method null as parameter to check if the NullPointerException is thrown properly, like this:
@Test
public void IfNullThenThrowException() {
   CustomComparator comparator = new CustomComparator();
   try {
      comparator.compare(400, null);
   } catch ( NullPointerException npe)  {
      return; //´expected behavior, terminate the test here
   }
   // unexpected behavior. if this line is reached, the test did not throw the NPE!
   Assertions.fail("Exception was not thrown!");
}
Note this may not be the optimal test for exceptions, as the JUnit API potentially provides better mechanisms for this. Please do let me know if you find better ways!
Now if we for some reason remove the NullPointerExceptions from the implementation, this test will let us know instantly. A failed test like this indicates that the specification was changed, perhaps unintentionally. If you wish to do that intentionally, I recommend changing the test first, as the test should be the determining factor for an implementation when using TDD.
And that’s it.
We implemented logic for a well-defined specification, by writing tests first and implementation second. Test Driven Development in action.
We also learned that getting the requirements or specification right is half of the work here. Analyzing requirements is a different discipline, however, which I won’t cover for this article.
Maybe for another one.
What is important to understand is that clear requirements are the prerequisite for TDD; and as you will actively use TDD or similar techniques, you will come to understand how important this clarity is when creating software and what will happen if you simply don’t.
In either case, I hope this article helped you grasp the general methodology of TDD.